How to Upload Discord Bot to Repository
Having a Discord bot that's up and running 24/vii, 365 days a year is the dream.
It doesn't matter if you only desire to have your bot 100% available for your server'south users, or if you want to abound and support hundreds of servers in the time to come.
No affair what you lot're going afterward, hosting your own Discord bot is the way to go!
In this detailed Discord bot hosting guide, nosotros're going to walk through the exact steps to become your bot upwards and running 24/vii in nether an hr.
We'll become over the all-time Discord bot hosting methods, and so walk through how to prepare your very own reliable bot hosting.
After reading this guide you lot'll know all the tricks to become a bot deployed on a VPS (Virtual Private Server), hosted, and live in under an hour, and best of all yous'll exist able to replicate this process for years to come up.
Tabular array of Contents
- 1 Here's How You Get Your Bot Upwards and Running 24/seven
- one.1 What this guide will cover
- one.2 Picking a reliable VPS host
- 1.2.ane A good hosting provider (such as Vultr VPS) will allow you to have:
- 1.3 Location, Location, Location
- 2 The All-time Discord Bot Hosting Method
-
- 2.0.1 What is Version Control?
- 2.0.ii Benefits of Version Controlled Code
- two.0.3 Git Learning Resources
- 2.1 Vultr VPS
- ii.ii Stride by Step Setup
- ii.3 Getting Your Discord Bot Running 24/7, 365
- 2.iii.ane Logging Into Your VPS Server
- 2.three.2 Logging In Through Secure Trounce (SSH) on Windows, Mac, and Linux
- 2.iii.2.1 Windows SSH Connectedness to VPS
- 2.3.2.2 Mac SSH Connection to VPS
- 2.3.2.three Linux SSH Connexion to VPS
- 2.three.3 Learning 3 Like shooting fish in a barrel Linux Commands
- 2.3.iii.1 Linux Control mkdir: Make a Directory
- 2.3.3.2 Linux Command ls: List All Files In the Current Directory
- 2.3.three.3 Linux Command cd: Become to a Directory of Choice
- 2.3.iv Putting These Commands Together and Setting Up Your Project
- two.3.5 Installing Node.js and Node Package Managing director
- 2.iii.six Updating NodeJS and NPM
- 2.3.seven Setting Up Our Node.js Project
- 2.3.viii Installing the Discord.js Library to Make Life Simple
- two.3.nine Verifying Our Installation
- 2.3.ten Uploading Your Bot's Files
- 2.iii.11 Getting your Discord bot up and running
- ii.iii.11.one Continuing the Procedure: Installing a Process Manager
- two.3.12 Testing Our Bot on a Live Discord Server
- 2.3.13 Shutting Off Your Discord Bot
- two.3.14 Terminal Thoughts on VPS Discord Bot Hosting
-
- 3 Alternative Discord Bot Hosting Options
- three.1 Heroku
- 3.1.1 Setup Guide: Hosting Your Discord Bot on Heroku
- 3.2 AWS (Amazon Spider web Services)
- 3.three Raspberry Pi
- three.1 Heroku
- iv Costless Discord Bot Hosting
- four.1 Cocky-Hosting
- 5 Hosting Specific Types of Discord Bots
- five.1 Discord.js Hosting
- five.ii Music Bot Hosting
- 5.3 Discord Bot Maker (DBM) Hosting
- 6 The Impact of Reliable Hosting on Your Discord Server
- 7 Final Thoughts
Here's How You Go Your Bot Up and Running 24/seven
Setting upwardly your own bot hosting might seem complicated, merely it'due south really much easier than it looks. The primal is to sympathise what we're actually doing step past step, and not simply blindly post-obit along without thinking or reading the explanations.
This is exactly why nosotros go through each step in-depth, letting yous actually understand and learn why we're doing things the way nosotros are.
What this guide will cover
We're going to first by going over how to ready upwards a JavaScript / Node.js bot on your own VPS host and and so talk through some alternative options similar Amazon AWS, Google Deject, and even how to host your own Discord bot on a Raspberry Pi.
Picking a reliable VPS host
The key to having solid reliable hosting for your bot is to utilize a well-known reputable third-political party hosting provider. You might've heard of Vultr, DigitalOcean, and Linode in the by if you've always researched VPS hosting options.
These are oftentimes the almost recommended VPS hosts based on their reliability, uptime, and support.
A good hosting provider (such as Vultr VPS ) will permit y'all to have:
- Reliable Uptime – I've been using Vultr as a VPS host for websites & bots for years, and accept experienced 99.ix% uptime as indicated by uptime analysis tools like Uptime Robot.
- Uncomplicated Control Panel – Navigating around your VPS control panel to modify settings should be incredibly piece of cake and unproblematic. We'll have detailed screenshots and steps for configuring your Discord bot in the coming sections, and then you'll be able to see how elementary it is to navigate immediate.
- DDoS Protection – If your server gets popular, there may be a third party that attempts to have it down through a distributed denial-of-service (DDoS) attack. Fortunately, Vultr VPS servers give yous the option to add DDoS protection if you choose.
- Reliable Operating Organization – The virtually affordable, cost-effective, and efficient VPS server operating system (OS) for hosting your Discord bot is a Linux Server. Using Windows Server, for example, requires yous to pay an extra licensing fee. By using a reliable Linux distribution similar Ubuntu Server, you can get up and running and pay just a few dollars ($) per calendar month.
- Frequent Backups – If something happens and you lot lose your data, having a backup will relieve yous. A reliable VPS provider will offer backup options and an easy recovery mechanism.
- SSD Storage & NVMe – To ensure your server doesn't take any bottlenecks and can handle a big number of requests, y'all'll want to notice a Discord bot host that offers fast storage through SSD (Solid Country Drives) and NVMe (NVM Express Storage Admission and Transport Protocol). The meliorate your server's hardware, the more than it'll resemble enterprise-class hardware.
- Reliable Support Squad – If you have any questions about your Discord bot hosting server, a dependable support team will save you from countless headaches and scrambling to discover answers yourself. Ordinarily, all you take to do is submit a support ticket for quick back up.
- FTP Access & SSH Back up – Virtually VPS hosts offering this right out of the box. FTP (File Transfer Protocol) will allow you to connect to your server and scan your files through a tool like FileZilla. SSH (Secure Shell) allows yous to connect to your server through a terminal to install software, send commands, and configure various server settings.
Dedicated Server vs. Shared Server
Using a VPS for hosting your discord bot volition let you to fully utilize the server resources you pay for, without sharing them among multiple spider web applications or websites.
A shared hosting server is slower and more sluggish when compared to a dedicated server.
Past following the VPS setup process in this guide, you lot'll exist able to set a crisp and fast VPS host that makes your bot run surprisingly apace.
Location, Location, Location
Since you have consummate control over your VPS server's location, when we get to the section of this guide where yous choose your server's zone, I'd recommend choosing i close to where nearly of your Discord users alive.
If that'southward not possible, or if your audience is worldwide, I'd go with a centrally located server with low ping and excellent connection speeds.
If your audience is global, information technology's never a bad idea to choose a major city in the Usa; In my personal experience, this has been both reliable and quick for all of my servers.
For this guide, nosotros'll be going over a complete Discord bot hosting setup on Vultr .
I've used Vultr for five years and have never had uptime or reliability problems.
Ready to swoop in? Let's practise information technology!
The All-time Discord Bot Hosting Method
The best method for hosting Discord bots and having near 100% uptime is a tertiary-political party Virtual Private Server (VPS).
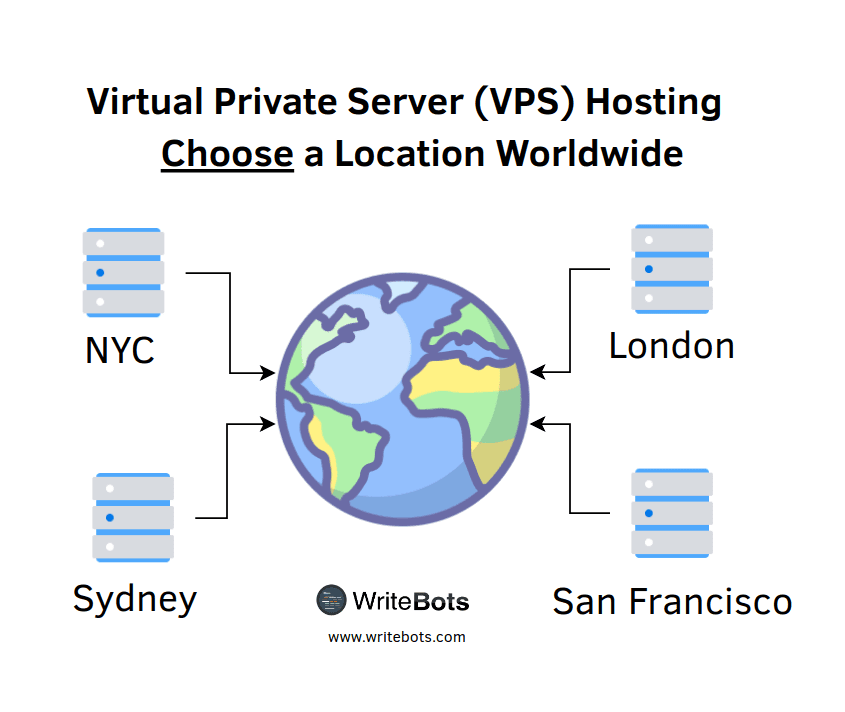
A Virtual Private Server is, every bit its proper noun suggests, a "virtual" server that'due south up and running 24/7 from your called location worldwide.
Fifty-fifty though it requires a little flake of setup to get up and running, the result is well worth it.
I like VPS hosting because it's both extremely affordable (think, a few dollars a month) and super reliable (y'all won't have to worry well-nigh your server going down, practically ever).
The flexibility you have with your ain Virtual Private Server is completely unheard of when you compare it to having your own self-hosted solution or even using a managed Discord bot host.
In the next few sections, nosotros're going to walk through the procedure of setting upwards a VPS through Vultr, getting your bot upwards and running, and and then testing out that connection to make sure your bot is working as intended.
Getting Your Lawmaking Fix and Version Controlled Through GitHub
Earlier nosotros can begin setting up your VPS Hosting, there's 1 very of import thing we can't forget: Version Control.
I desire to start off by saying this step is optional but highly recommended.
What is Version Control?
Version Control in software is a way to keep rail of every single alter fabricated to bits of code throughout the entire lifecycle of that code, from start to cease.
To put it but, every single time yous modify something in your code (whether you add some functionality, gear up/remove some bugs, etc.), yous then "check-in" or "commit" your changes.
Benefits of Version Controlled Lawmaking
In one case your changes are "checked in," you'll be able to get back and compare those changes to past versions, letting you lot clearly see what inverse.
You'll also exist able to revert back to an old version if you accidentally suspension something.
This is not bad if you're just starting out and want to accept the freedom to experiment with your bot.
Taking note of all the reasons above, this is why we're going to fix our Discord Bot Version Control system through GitHub beginning.
And if you're wondering, "Why GitHub?" Two Reasons: Information technology's costless, and information technology's like shooting fish in a barrel!
We're not going to walk through a detailed setup right now, every bit it'due south out of the scope of this article (nosotros're talking about bot hosting, after all).
But in that location are some great resources yous can follow along with to get version control set upwardly from scratch.
Git Learning Resources
The start place you lot should browse effectually is the GitHub Guides help page . This has everything from quick lessons on how Git works all the way to more advanced Git topics.
If you want to become "straight to the source," every bit they say, then I'd recommend starting with this guide on GitHub flow.
In one case you've gone through that one and sympathise the nuts, GitHub'south Hullo Globe guide is a keen starting point for going through the whole version control procedure from start to finish with some sample files.
Once you've placed all of your lawmaking under version control, y'all tin rest easy knowing all of your changes are tracked and preserved!
At present let's motion on to the fun stuff — actually hosting your Discord bot through a third-party server.
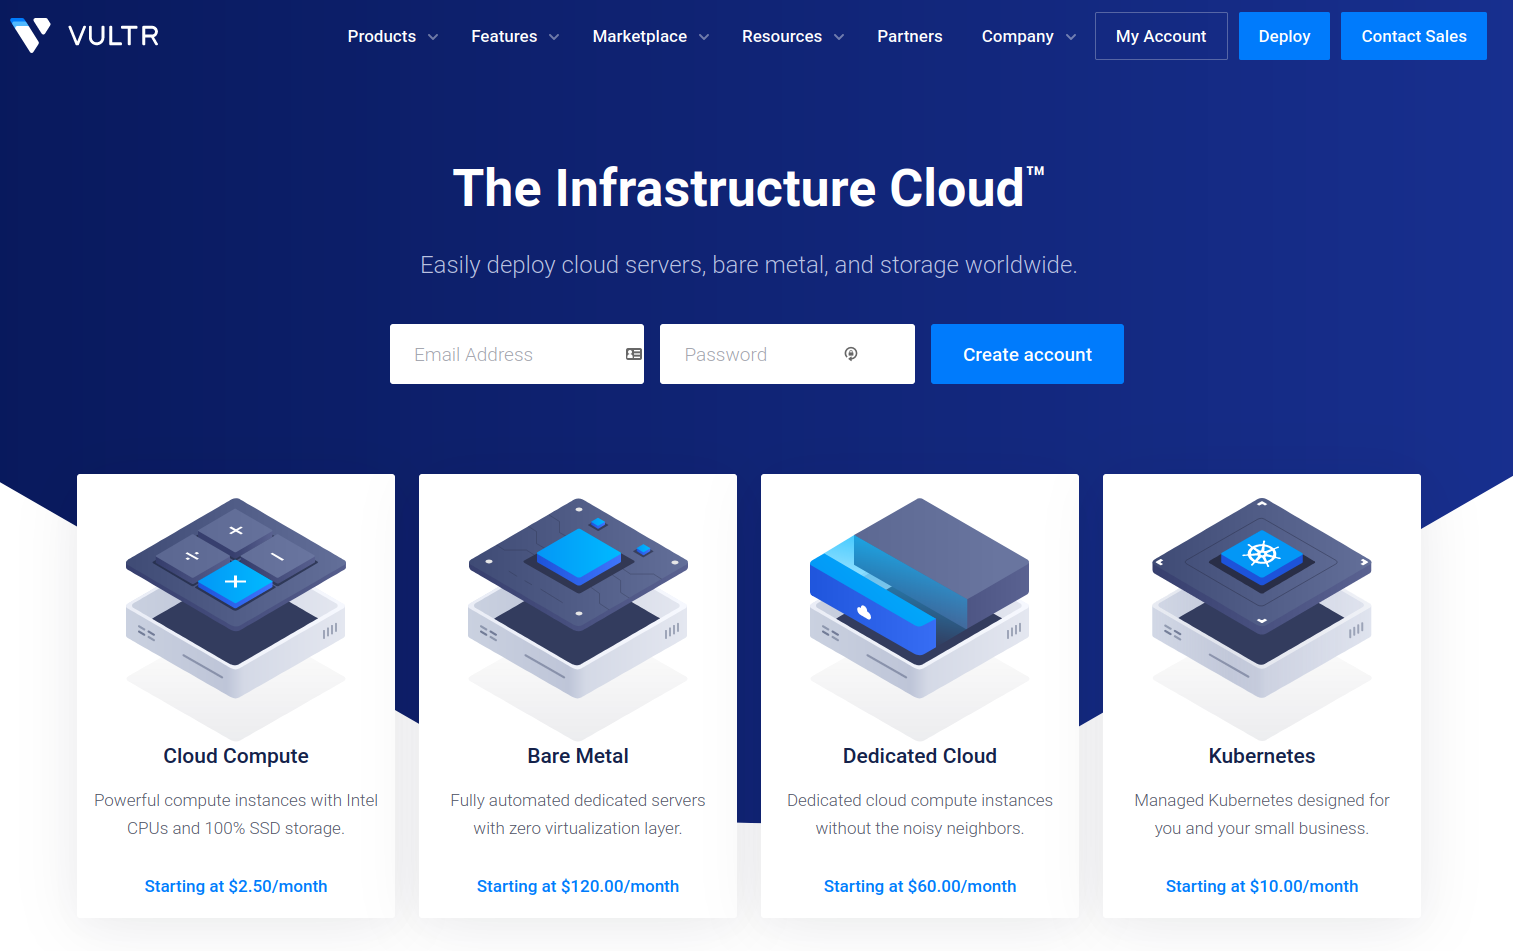
Vultr VPS
And it begins… This is the office of the guide where nosotros finally start setting upwards and configuring your Virtual Private Server to run your Discord bot 24/7.
We will exist using Vultr every bit our VPS of choice since they accept an awesome deal for WriteBots readers: Get $100 instantly to spend on hosting if y'all sign upwards with a brand new account! Yous get the $100 for several weeks, which is plenty to examination a lot of different bots.
We'll be showing all of this with an case ping-pong bot made in JavaScript / Node.js, but information technology can hands be modified to fit whatsoever programming linguistic communication on whatsoever platform.
Suggested Reading: If you're interested in coding/creating a Discord bot from scratch, take a peek at our detailed guide on how to make a Discord bot . We cover every aspect from showtime to terminate, letting yous create your side by side bot in confidence.
Your kickoff step is to create an account on Vultr.
In one case you lot have your account ready and you're all logged in, we'll begin setting upward our bot step by step in the next section.
Step by Pace Setup
You've created your account and you lot've logged into Vultr. You lot should be at the primary dwelling screen that looks something like this:
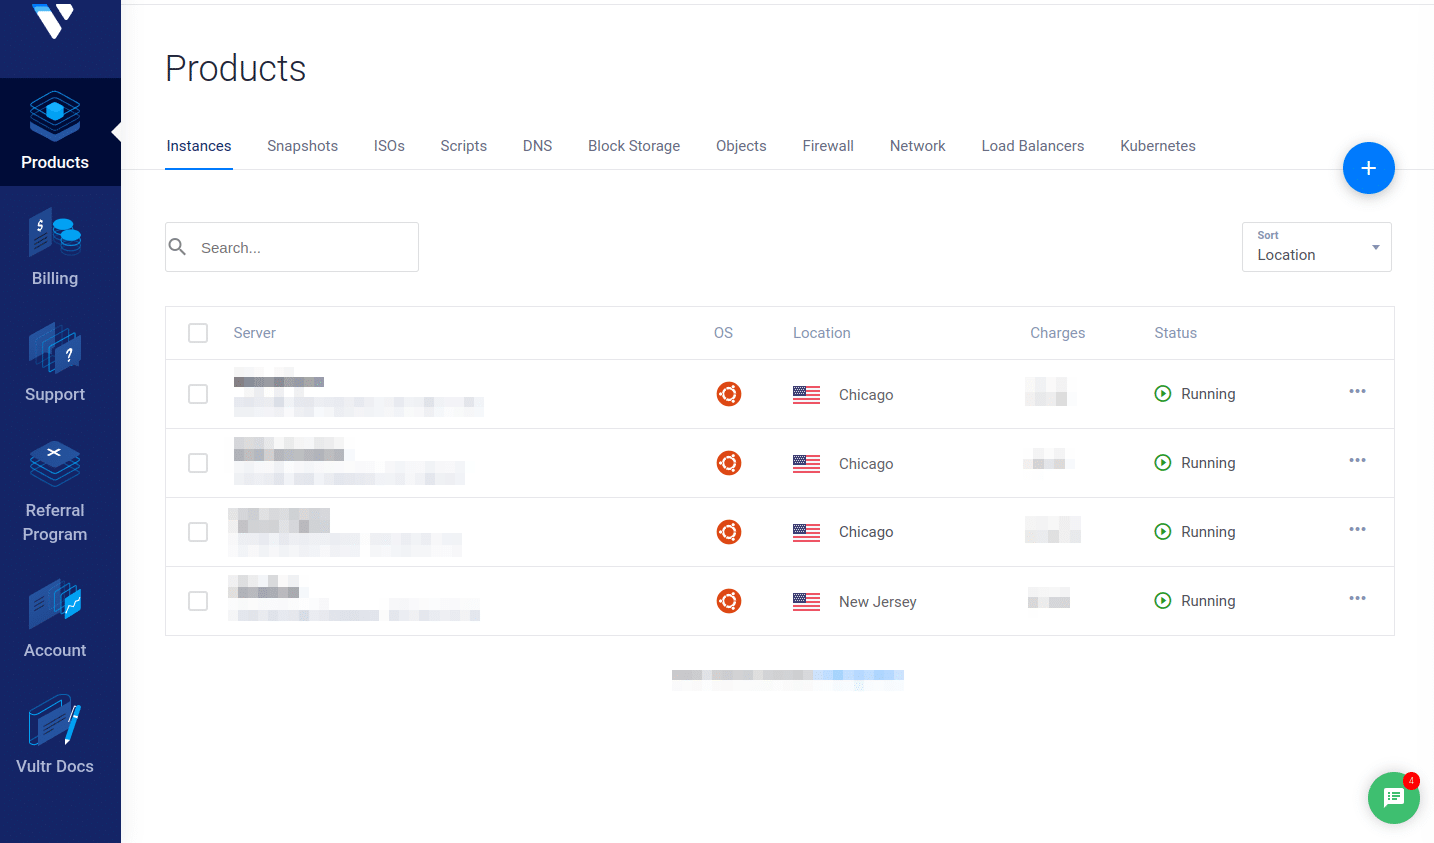
Run across that blueish circle with the "+" inside? That's what nosotros'll click side by side to deploy our new VPS.
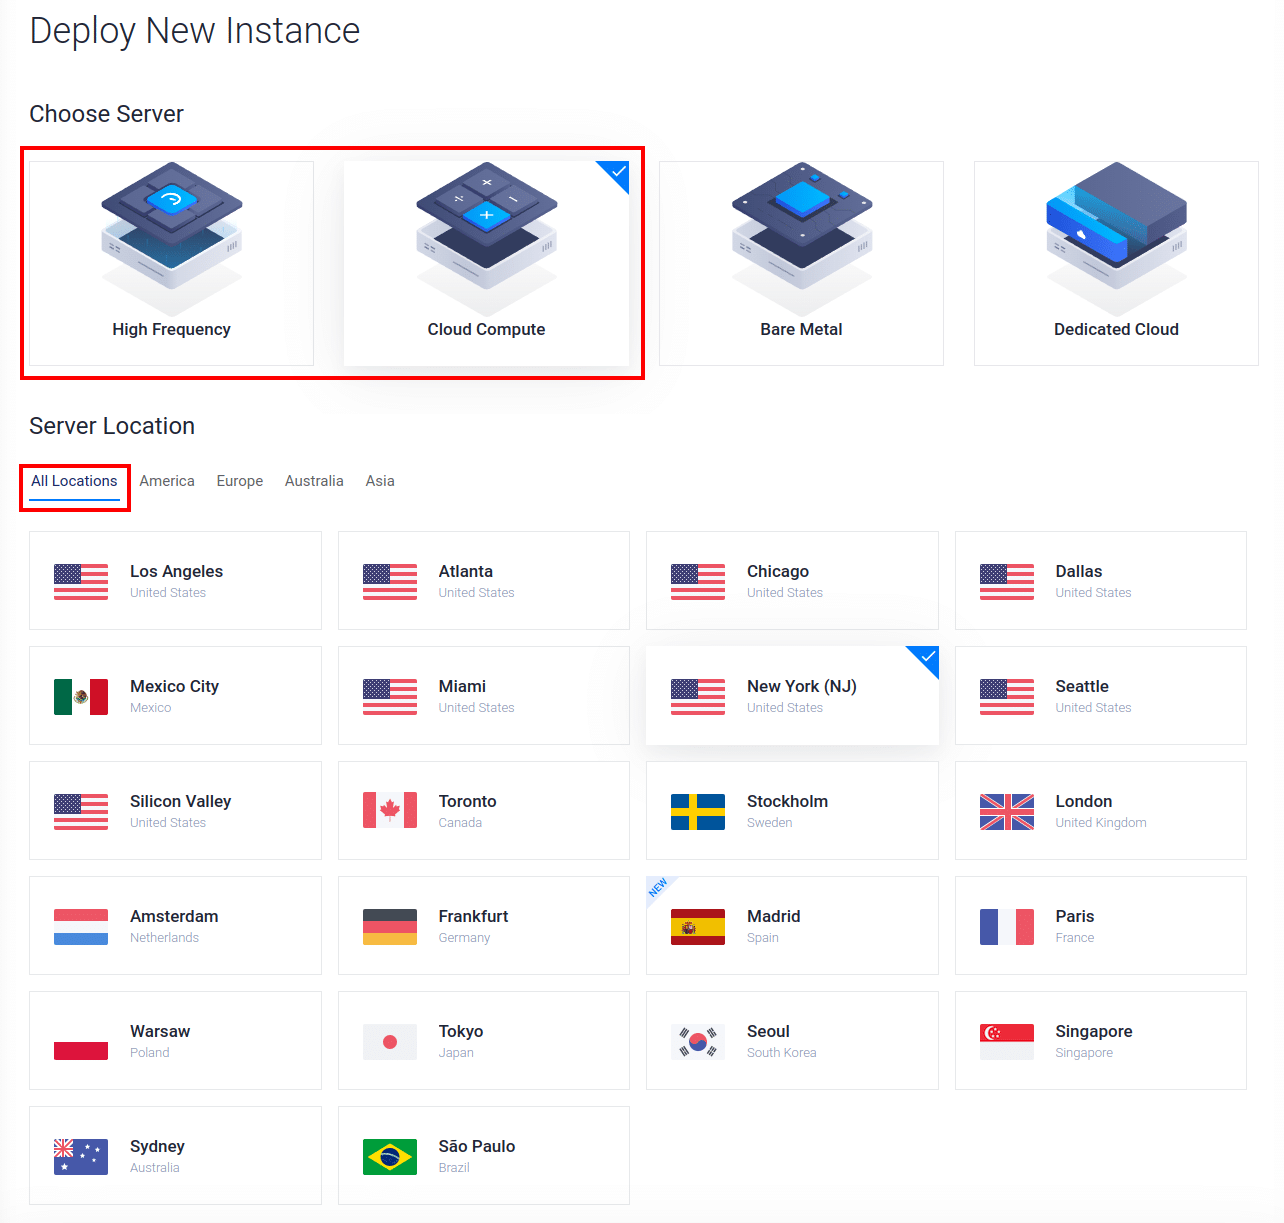
Yous tin select either "Deject Compute" ($2.50/mo everyman tier) or "High Frequency" ($six/mo everyman tier, but faster) then choose a location that's closest to the bulk of your audience.
Annotation that some locations have more options for hosting types than others, such as the New York (NJ) location which offers more monthly hosting options.
If you don't know what location you lot should cull, picking any of the The states locations is always a rubber bet.

Next, yous'll have to choose your "Server Type" and "Server Size".
For Server Blazon, I'd recommend going with 64-chip Ubuntu 21.10. It'south stable and has a lot of documentation around it on the spider web. Ubuntu is an easier Linux to work with for beginners, which besides makes it a great choice.
For Server Size, I recommend choosing an option between $3.fifty/mo – $5/mo to starting time. I can hear you saying it already, "But why not the $2.50/mo option? Information technology's cheaper, isn't it?" Well, the $2.50/mo option in Vultr only includes an IPV6 Address. It's simply the $3.fifty/mo and higher options that include an IPV4 address, which is needed to access your server using a "normal-looking" IP address (see beneath).
If this sounds "alien" to yous, a quick explanation is how IPV4 vs. IPV6 addresses look:
Hither's an IPV4 IP Address: 127.0.0.i
Hither's an IPV6 IP Accost: 3FFE:F200:0294:AB0D:0394:4567:8911:ABDE
You lot'll be using this "IP Address" to connect to your server and upload your bot's files, etc. You lot don't want to exist typing that IPV6 address each time, practise you? Having an IPV4 accost is much cleaner.
Of course, if y'all don't mind it and are willing to research a bit, you lot tin can cull the $2.50/mo option with an IPV6 accost. This is entirely up to yous — but I'd recommend IPV4, or the $three.50/mo and up options, for beginners.
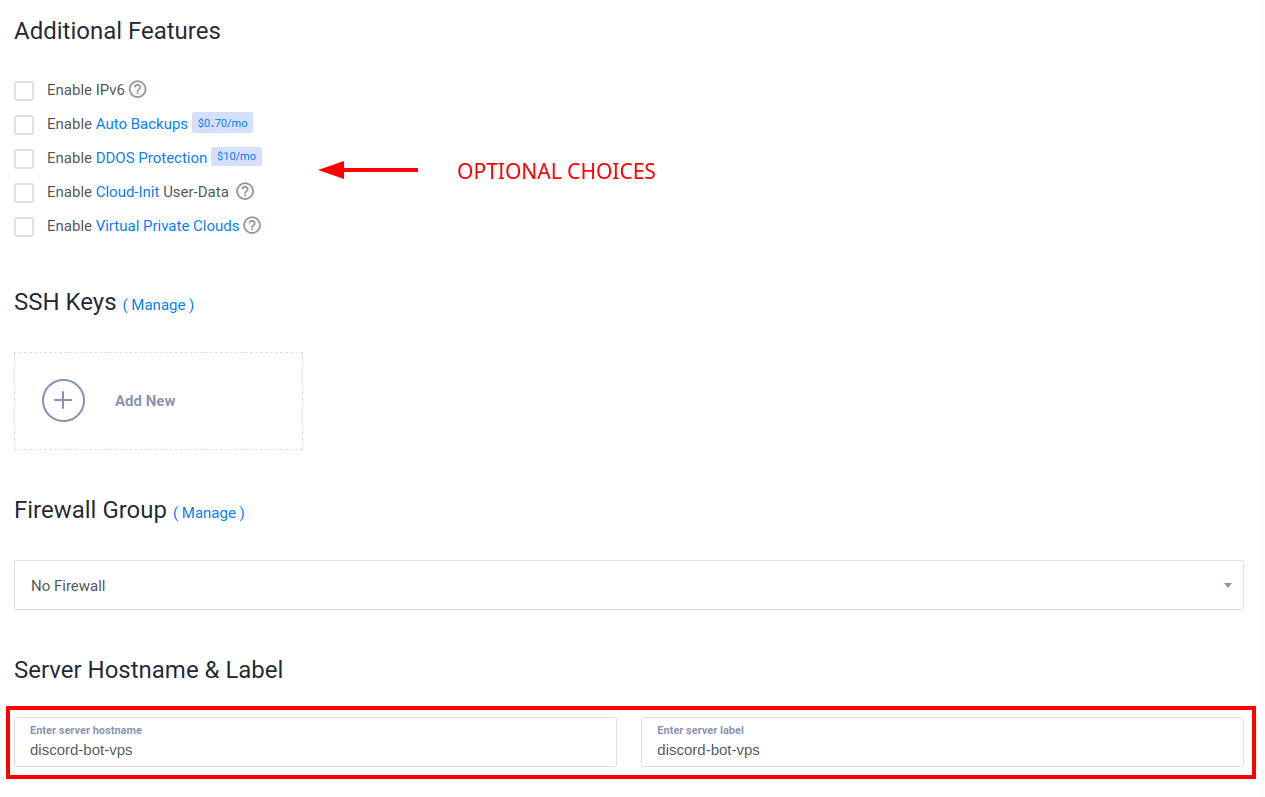
For the next department, yous can skip by "Additional Features" (unless you desire to add Auto Backups and DDoS Protection), "Startup Script", and "SSH Keys" for now.
The one piece y'all'll want to fill out is the "Server Hostname & Label" section. This is where y'all name your server.
Once you've given your server a name and are satisfied with your settings, you tin click the "Deploy Now" button!

You lot'll meet your new VPS server appear on the "Products" page in Vultr, and you'll encounter a spinning orange indicator showing that it's currently deploying/installing.
It tin can have up to ~5 minutes for your server to be fully deployed.

Once the indicator stops spinning, you lot'll run into that your server is "Running" and prepare to go!
You should also exist able to see the IP Address of your server next to its proper name.

Congratulations! Y'all've successfully fix your first VPS.
We merely have one trivial problem… it's empty and there's naught currently running.
In the next section, nosotros'll talk about how to connect to your VPS, load all of your bot files into information technology, and get your bot up and running on your Discord server.
Getting Your Discord Bot Running 24/vii, 365
You've "deployed" your empty VPS, and it's sitting there waiting for your next command… what should you lot exercise next?
Well, hither's what we're going to do: Load up all your bot files and starting time up your Discord bot! We'll walk through doing this step-past-step in the next few sections of this bot hosting guide.
Logging Into Your VPS Server
But start, we're going to want to take a look at our VPS in more detail. Click the name of your server on the Vultr "Products" folio to dig deeper:

Once within, you'll run into something like this:
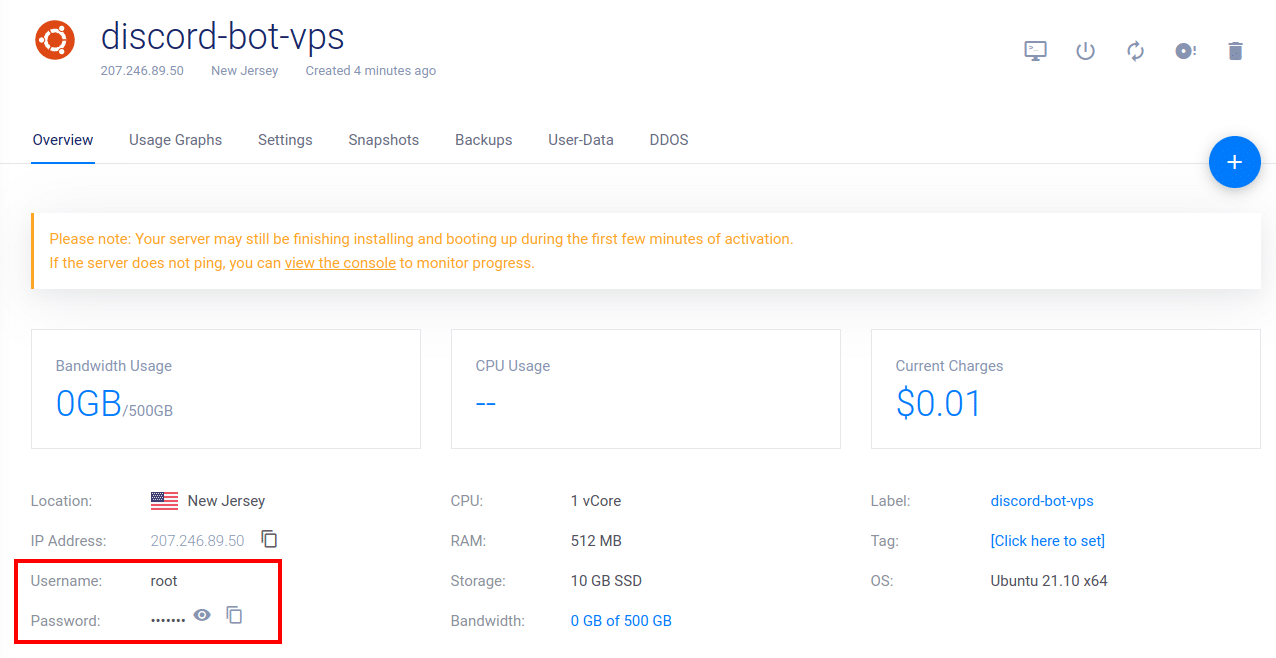
You may observe that orange message lingering at the elevation, saying that it might have a few minutes to boot up and activate your server. Yous can ignore this message later you give your server about 5 minutes to boot up.
You lot can besides see your server administrator, also known equally root, "username" and "password" (click the lilliputian eye to show your password, and the newspaper icon to copy the password).
This is what you lot'll use to log in to your server and accept total control over its configuration.
Logging In Through Secure Beat out (SSH) on Windows, Mac, and Linux
The best way to login into your server and start sending commands is through the Secure Shell Protocol (SSH). Whether you're using Windows (10+), Mac, or Linux, each of these operating systems volition allow you to connect to your server through SSH.
Nosotros're going to walk through the process on Windows, Mac, and Linux so that you can connect to your server and start setting upwardly your Discord bot.
Windows SSH Connectedness to VPS
For Windows ten and up, SSH is included inside of Command Prompt, making it very convenient to connect to your server.
In the examples below, I'll exist using Windows 10 to connect to my newly created Vultr VPS.
- Open Command Prompt on your machine
- Once the command prompt is opened, type the SSH command, substituting the "twenty.twenty.xx.twenty" for your server IP found on your Vultr command panel:
ssh root@xx.20.twenty.xx - If you get a message saying, "The authenticity of the host can't be established", this is okay. Type "yes" into the command prompt and hit enter.
- Copy your password from Vultr and paste it into the Command Prompt window. Notation that for security purposes, the characters of your password will non testify up in the black console window as you're typing them, or if you copy/paste them. This is normal. Hit enter to submit your password and log in.
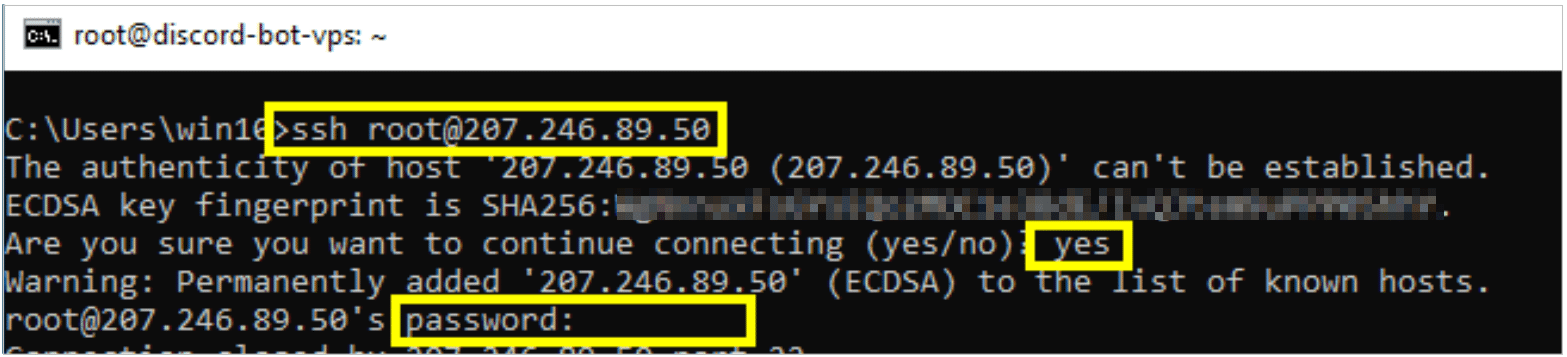
- Once y'all've logged in, you lot'll see the last window become: "root@your-server-name". Congratulations, this means you've successfully logged into your server!
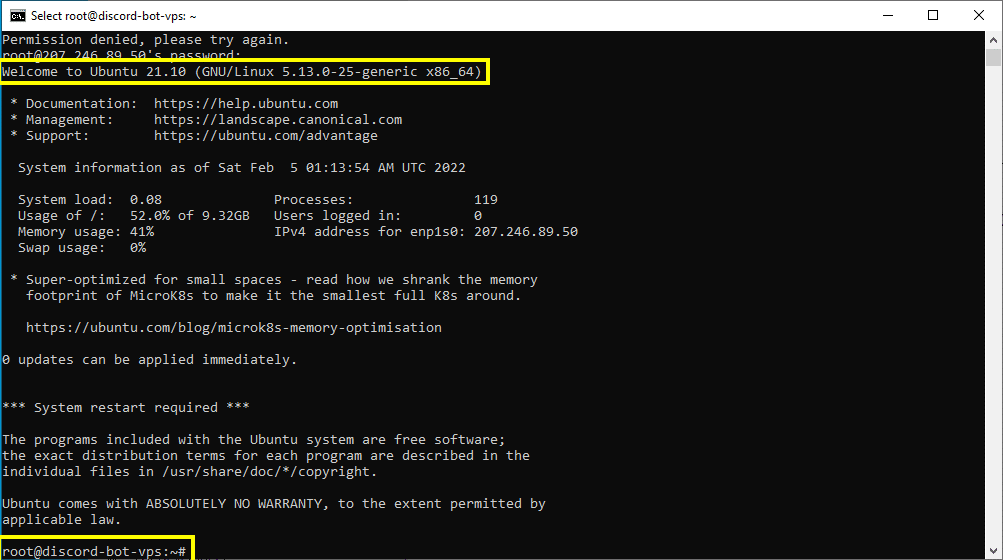
- Now that you lot're logged in, you lot can move on to the "Learning Iii Easy Linux Commands" section below.
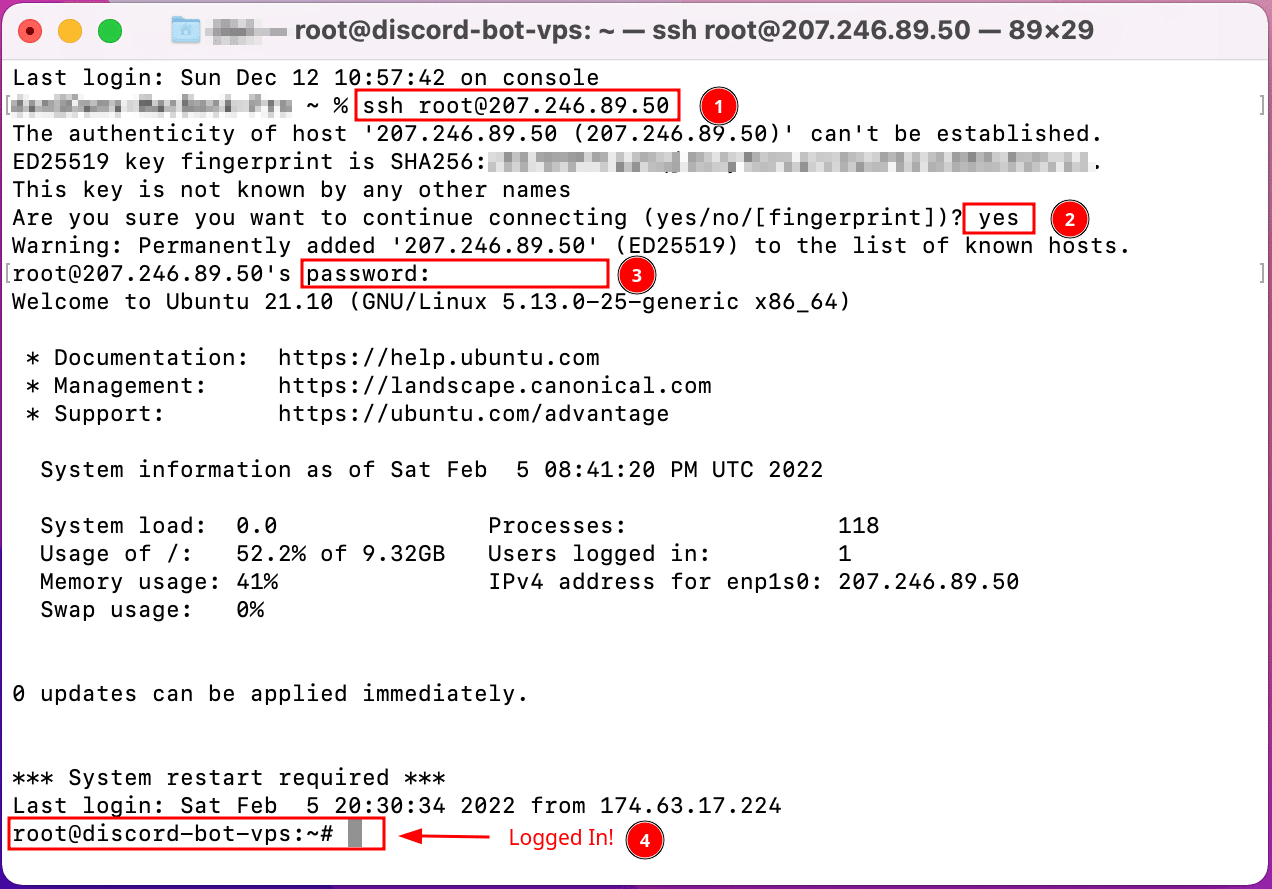
Mac SSH Connectedness to VPS
If you lot're on a Mac, you lot can easily connect to your VPS through Secure Vanquish (SSH) by using your final. The following steps volition bear witness you exactly how information technology's done.
- Open your Mac concluding.
- Referencing the image beneath, type the SSH control following the format below, and supercede twenty.20.20.20 with your VPS IP:
ssh root@xx.xx.twenty.twenty - On the "Authenticity of this host can't exist established" message, merely type "yes" in the terminal and printing enter.
- Copy and paste the password of your VPS from the Vultr control console into your terminal. Yous can too manually type the password if you choose.
- Success! You should be logged in to your server's root habitation binder.
Linux SSH Connection to VPS
To connect to your VPS on Linux through Secure Shell (SSH), all y'all need to do is follow a few simple steps.
- Open up your last.
- Type the SSH command, replacing xx.xx.20.20 with the IP accost of your VPS server (plant on the Vultr control panel).
ssh root@xx.xx.20.20 - If you go a bulletin saying "The actuality of the host can't exist established", type "yeah" and hit enter.
- Copy and paste your password from your VPS data page on Vultr
- You should be successfully logged in and set up to configure your Discord bot!
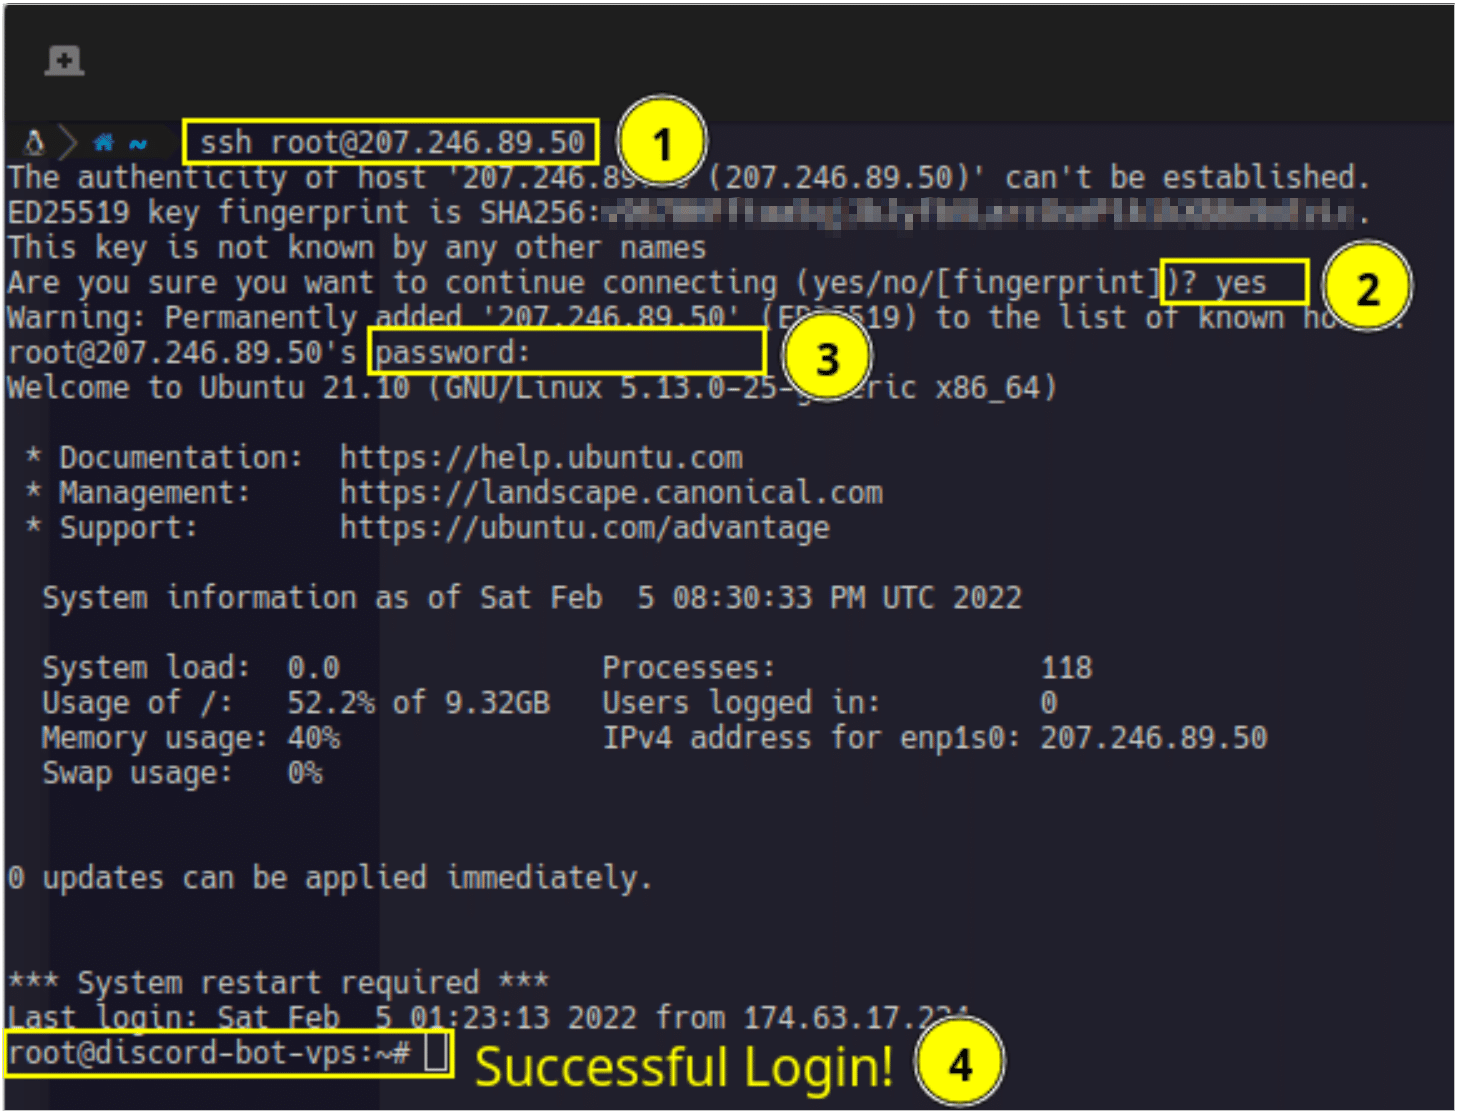
Once y'all've logged in, you'll automatically find yourself in the "home" directory, which is indicated by the tilde "~".
Now it's time to ready your directory, become node.js and npm setup, and so load all of your bot's files.
Learning Three Like shooting fish in a barrel Linux Commands
Before we go into the details, y'all're going to larn a few very easy-to-remember Linux commands.
Linux Command mkdir: Brand a Directory
The get-go command is to make a folder or a "directory". The command is curt for "Make Directory", and is spelled out like and so: mkdir.
Hither's how you lot would use this command in activeness:
mkdir my-special-folder Based on where you currently are in the console window, this command volition create a folder and proper name it "my-special-folder". Easy-peasy.
Linux Command ls: Listing All Files In the Current Directory
The next command we're going to learn is used to listing all of the files in the electric current directory you're in.
Here's how y'all would use it:
ls You would type 2 characters, "ls", and what you would see in your console is a list of files currently in that folder. It'southward a uncomplicated command.
Linux Control cd: Go to a Directory of Choice
The last control you're going to acquire is how to "bound" into another directory. Since all nosotros're doing is typing and not really clicking to bound from binder to folder, you'll have to use the "Change Directory" command, which in shorthand turns out to exist: cd.
Hither's how you would use it to jump from the current directory to a subfolder called "test":
cd my-special-subfolder And an case: (## are comments)
## listing all of the contents of our current folder root@discord-bot-vps:~# ls examination ## changing directory to the 'exam' binder root@discord-bot-vps:~# cd test ## meet the path change? We are inside the 'exam' folder! root@discord-bot-vps:~/exam# And that's all there is to the "change directory" command.
Putting These Commands Together and Setting Up Your Project
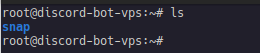
So, before we even get started, let's blazon "ls" in the window. Since we don't currently have any files in our home directory, you should get — nothing! At that place's a hazard yous'll accept a "snap" folder, simply this can exist ignored.
Now, if we create a directory named "ping-pong-bot" and and so type "ls" over again, we should see that directory be created on our server. Allow's give information technology a shot.

And there nosotros accept information technology… Information technology worked. Nosotros created a folder (directory) called "ping-pong-bot", and and so saw it appear once we listed everything in our current directory.
All that's left for u.s.a. to do now is use the "Change Directory" command to go inside the ping-pong-bot folder:
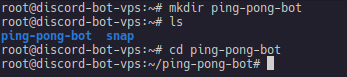
And at that place nosotros have it, nosotros're in the /ping-pong-bot/ directory!
Installing Node.js and Node Bundle Manager
Side by side, we're going to install node.js on our server.
This tin exist done with a few quick Ubuntu commands (type each line one at a fourth dimension):
sudo apt-get install nodejs 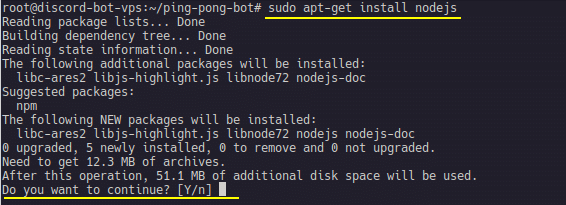
Once you type that command you'll see it read the package and ask you lot if yous want to install information technology.
You lot'll want to type "y" for yep, and the installation will continue. Information technology may take a few minutes to fully install, so be patient at this stage.
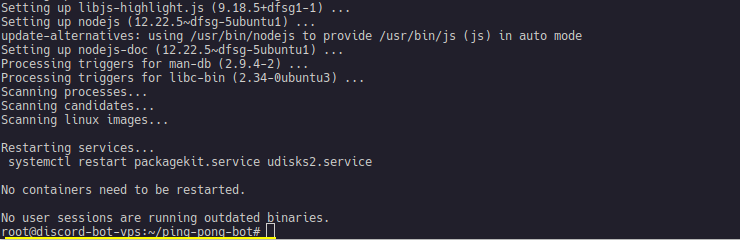
Optional Stride: If you get a "Kernel outdated" bulletin, and a pink screen like shown below, click "Enter" on the commencement screen, and so hitting "Tab" to leap to the <Ok> button. In one case <Ok> is selected in reddish, click "Enter" again to restart the recommended services on your VPS.


Once you lot're dorsum in the subfolder y'all created, node.js has been installed:
At present nosotros'll want to do the same thing with NPM, which is "Node Bundle Manager"
Blazon this control to install information technology:
sudo apt-get install npm You'll have to blazon "y" again for yeah to continue installation, but like when you installed node.js in the previous step.
Once y'all've installed node.js and npm, fourth dimension to check the installation.
To do that, we can use ii commands to check their versions:
node -five npm -v 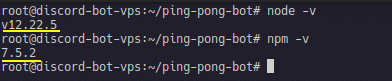
We're getting version numbers for node and npm, but these are out of date !
The next section volition guide yous through updating these versions.
Updating NodeJS and NPM
In guild for our Discord bot to work correctly, we take to have a NodeJS version of 16.10 and above. Past running a few unproblematic commands, we tin can update our Node and Npm installations:
sudo npm install -g north sudo n stable hash -r 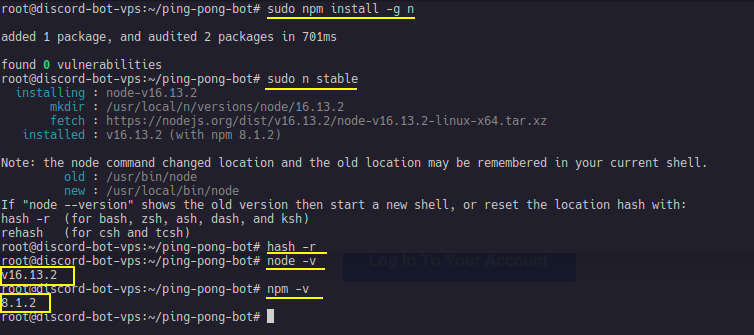
You should see higher version numbers, and your node -v command should return a version 16 and higher up.
Setting Upwards Our Node.js Projection
Now we desire to "initialize" our project using the Node Package Manager.
This is done through 1 simple control, and it'll bring up a "wizard" where you follow along with the steps and blazon in your responses.
npm init Of import: Earlier y'all type the "npm init" command, make sure you're yet in the right folder!
Node will exist creating all of your project'southward files in the folder you lot are currently in, so double-check the path to make sure you're yet in the right ane.
Here's what the setup process for "npm init" should look similar.
I just kept hitting "enter" to get with default values, and the just thing I changed was the "Description" field.
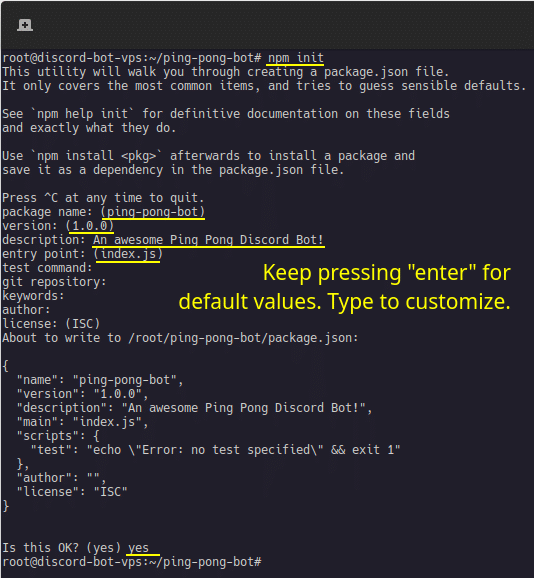
In one case yous blazon "yes" at the end, your node projection will have been created.
Installing the Discord.js Library to Brand Life Simple
To brand life super easy nosotros're going to be using the "discord.js" library in our ping pong bot.
A library is a set of pre-written code that interfaces with the Discord API; this is what lets united states ship/receive commands from Discord to/from our server.
Additional Reading: If yous want to acquire more almost setting up discord.js and libraries, check out this guide on how to brand a Discord bot. You lot can also jump straight to the libraries function of the guide , or directly to the JavaScript bot creation portion .
In any case, installing the "discord.js" library is very simple, involving just i Linux control.
In your Vultr server console (or your own SSH client; see the SSH client section of this guide), while in your bot's directory, type the following command:
npm install discord.js --save Yous'll see different colored text while the installation procedure finishes.
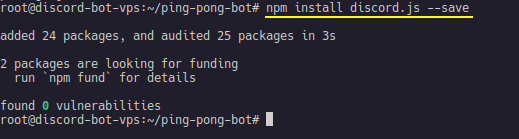
Past adding –salvage to the end of our "npm install" command nosotros made sure that our bundle.json file was updated to include discord.js as a dependency.
We'll verify our installation in the side by side section.
Verifying Our Installation
Information technology'due south fourth dimension to make certain everything is installed correctly.
The first thing you'll want to do is type "ls" to listing all of the files in this directory. You should see the new "package.json" file that was created when we ran "npm init" and also a new folder titled "node_modules":

The node_modules folder contains our new "discord.js" dependency that we only installed.
We also want to double-check the "parcel.json" file to make sure "discord.js" was added as a dependency.
We tin can do this by running the "cat" command:
cat package.json Afterwards this control has been executed, we should see its contents with the "discord.js" dependency included successfully:
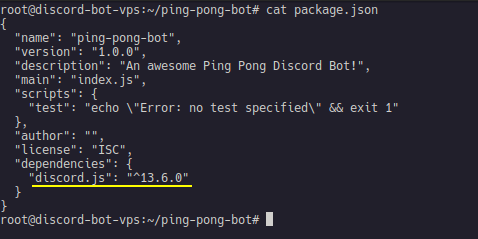
Success! Everything nosotros need has been installed.
All that's left for u.s.a. to do is upload our bot's files to the server and go our bot upward and running! We'll do this in the next section step past step.
Uploading Your Bot'south Files
Whew! The tough office of our setup is all finished!
From here on out, all that'due south left for us to do is to (one) Upload your bot'due south files and (2) Launch your Discord bot!
Remember how in the last section, we ran "npm-init" and used the default "Entry Point" or "main" filename: index.js?
You can either modify your node package.json file and change the entry indicate file name to any y'all'd like, or y'all can go out it at its default "index.js".
Note: If you desire to modify your "bundle.json" file direct from the control line , yous can practice it with nano! Nano is a Linux text editor that lets y'all modify files on the wing.
To acquire how to use nano, cheque out this guide to nano . But before you read that guide, this is very important: Whenever they write "^Ten" or "^K", annihilation with a carat (^) earlier a alphabetic character, the carat is the CTRL key on your keyboard!
This ways that "^X" is CTRL+X on your keyboard. I just wanted to clear this up, every bit information technology's very commonplace to get stuck with the nano text editor.
Important: To use nano, you'll need your ain SSH customer. Accept a wait at the SSH department of this guide higher up (Windows, Mac, Linux) for more than details on setting this up.
If you look inside of your package.json file (by typing the command: "cat packet.json"), you'll encounter what your electric current "main" is set to.

Anyways, let's actually upload our bot's principal file containing all of our code.
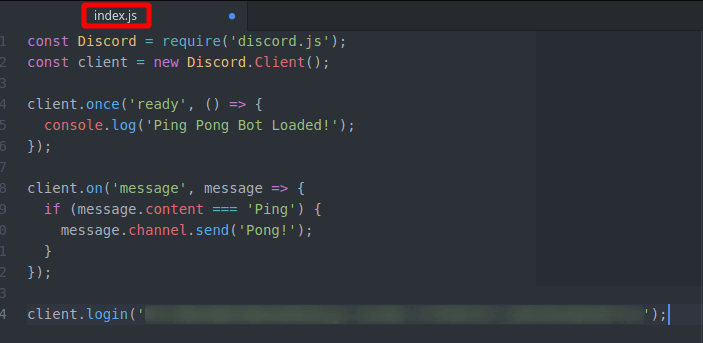
Hither's what our "index.js" will comprise:
const { Client, Intents } = crave('discord.js'); const intentList = new Intents(); intentList.add(Intents.FLAGS.GUILDS, Intents.FLAGS.GUILD_MESSAGES); const customer = new Client({ intents: intentList }); client.once('fix', () => { console.log('Ping Pong Bot Loaded!'); }); client.on('message', message => { if (message.content === 'Ping') { message.channel.send('Pong!'); } }); customer.login('your-bot-token-goes-here'); This is a simple bot that uses the "discord.js" library to write a message every bit soon equally the bot is all started up and loaded proverb, "Ping Pong Bot Loaded!"
As presently as someone types a message that says "Ping", our bot volition respond, "Pong!" Super unproblematic.
Important – Do Not SKIP: Don't forget to create your bot application and go a token. If y'all haven't washed this still, check out this guide on how to get a discord bot token . Information technology walks you through setting upwards a "bot app" on Discord and revealing your token.
Once y'all accept your token, be sure to replace the "your-bot-token-goes-hither" inside of index.js with your token. This is critical, and your bot won't connect to Discord otherwise.
To brand uploading our files equally easy as possible, nosotros're going to connect to our server through an application chosen "Filezilla".

Note: You lot can download FileZilla directly from this link.
Once you lot've downloaded FileZilla, open up the client! You should see a screen similar to this (except your colour scheme may exist dissimilar from mine):
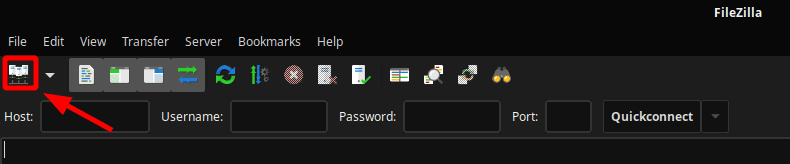
You'll want to click that icon in the upper left-paw corner in order to set a connection to your server.
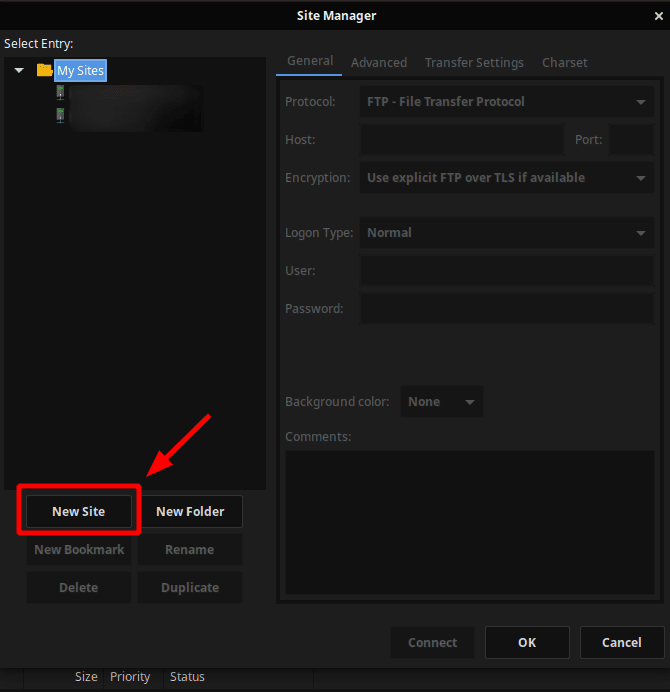
And and so, you'll want to click the "New Site" button.
This is where you lot'll have to go back to Vultr and get your IP Accost, Username, and Password from your "Server Information" Page:
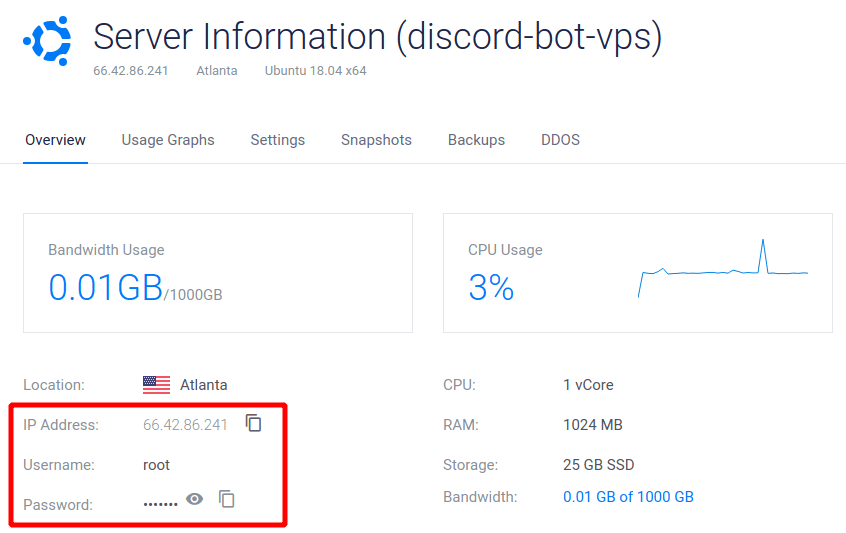
Y'all'll need this data for the next few steps in lodge to connect to your server.
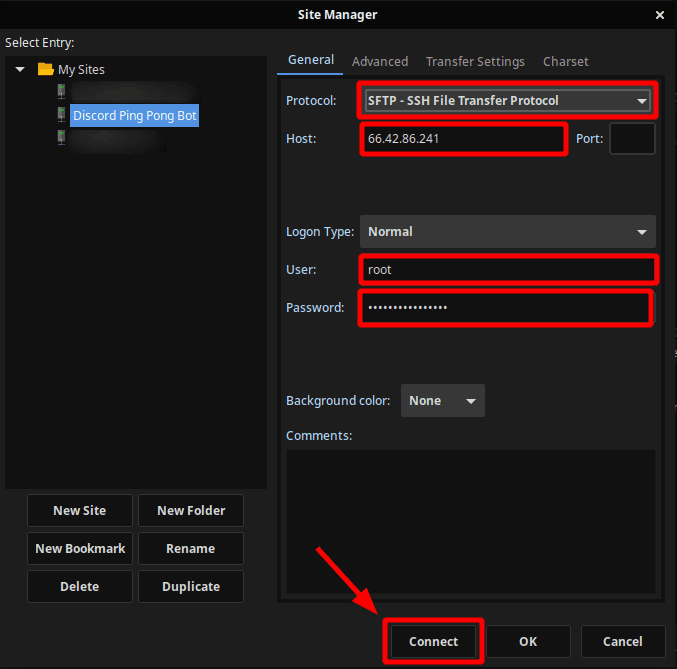
What you want to do next is to select the following settings:
- Protocol: SFTP – SSH File Transfer Protocol
- Port: LEAVE EMPTY
- Logon Blazon: Normal
- User: root (from Vultr)
- Password: (from Vultr)
Then click on the "Connect" push button!
Since this is your kickoff time connecting to your server, and because we're connecting securely through the "SSH File Transfer Protocol," yous'll take this message come up:
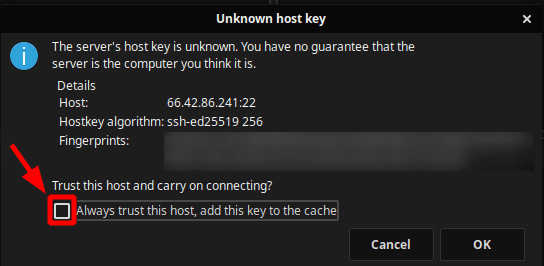
Click the "Always trust this host" checkbox to acknowledge the message and hide this prompt whenever yous connect in the future.
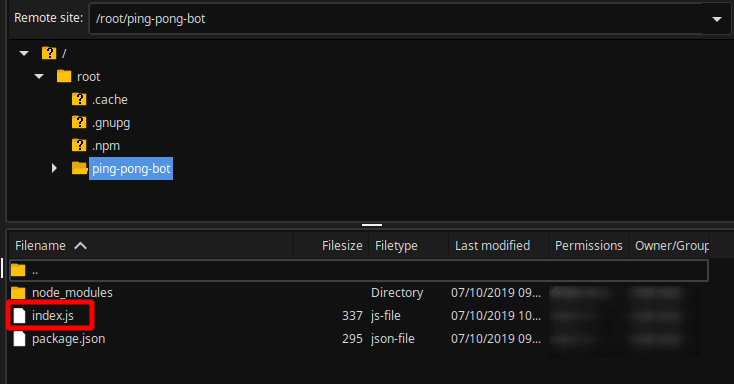
You should then connect and see all of your server'due south files in the "Remote Site" right-paw side of FileZilla!
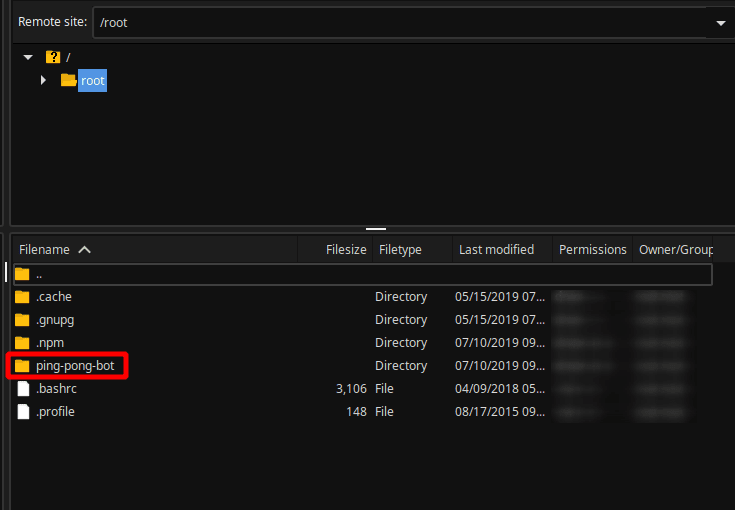
We can come across our ping-pong-bot folder listed, and can now click through and browse around on our server just like we would on our reckoner.
The starting time thing you want to practice is browse into your bot folder (in my case, I clicked into 'ping-pong-bot').
Now, I'one thousand going to go along my estimator, create a text file chosen "alphabetize.js", and paste the bot code from the last department.
I'll so save this file and drag it into the ping-pot-bot binder on FileZilla to upload information technology.
… so I did just that. I created the "alphabetize.js" file on my computer and saved it. Don't forget to include your token!
Then I dragged the file into the 'ping-pong-bot' binder on FileZilla, and saw it uploaded successfully:
To double-check this, we can become into our Vultr server console (or SSH client) and blazon "ls" to list all files:

Yep, "alphabetize.js" is definitely there!
And as a final sanity bank check, we can even do "true cat index.js" to see its contents:
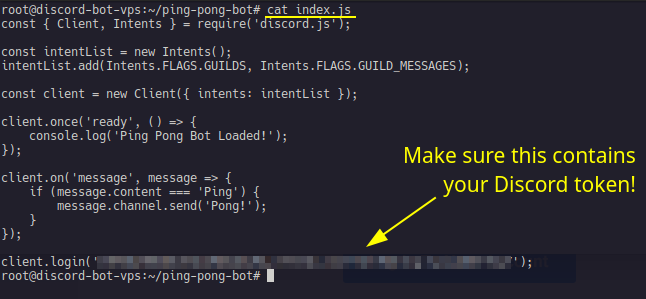
Yes.. that definitely looks like our ping pong bot'south code, alright!
Important Step: If you haven't already generated your Discord bot token and added it to your bot's index.js file on your Discord server, follow forth with the discord bot token guide to go all of this setup.

The final step in this process is to get our bot upwards and running and then examination information technology out on Discord!
Getting your Discord bot up and running
We are on the final few steps before we tin can actually see our bot in action on Discord.
Standing the Procedure: Installing a Process Manager
The next thing we demand to do is install a procedure managing director. Why you might ask?
Well, a reliable procedure managing director is going to permit us run multiple bots on our VPS (if we then choose), and perform all of the memory management required to continue every task operating at its peak.

PM2 (Production Process Managing director for Node.js) is an awesome choice that's very widely used with Node.js projects.
Check out PM2's website for more than details on its capabilities also equally installation instructions.
Installing PM2 is super simple and requires running this control on your server'south control line (or SSH shell).
Make sure y'all "cd" (change directory) to your main bot's project folder before running this command:
npm install pm2 -g You should run across the installer doing its matter:

… and as soon as the progress bar stops scrolling, PM2 should have been installed successfully!
To examination if PM2 was installed successfully, we can list all currently running processes (which should be none, since nosotros oasis't started any!):
pm2 listing 
Aye, merely as expected, no running processes. Time to fire upward our bot!
We can do this through some other unproblematic control using pm2:
pm2 beginning alphabetize.js Note: You should alter "index.js" to whatever your bot'southward main lawmaking filename is.
Note: pm2 starting time will neglect if you forgot to "cd" into your "ping-pong-bot" directory. Double-cheque this.
Later on you run the "pm2 start" control, should meet a message from PM2 saying that it started an instance of your bot, and your bot should now be successfully running!

Success! We tin see App Name shows "index", and or Status shows as "online"!
If you ever desire to stop your bot (or any procedure you lot beginning with PM2), all you take to do is run the post-obit command:
pm2 end index.js And if you ever desire to list all your currently running processes, yous can run a simple "pm2 list" command on your server.
Troubleshooting: If you run "pm2 list" and your bot shows equally "errored" in red text (run into screenshot below), this might be considering you didn't add together your Discord bot token to index.js. I can't stress enough how important it is that you did this.
To see exactly what your Discord bot'due south error message is, type the command:
true cat ~/.pm2/logs/index-fault.log This will open upward the PM2 error log, letting you see the Discord.js error messages that prevented your bot from running. Copy and pasting these messages into a search engine is the quickest way to get a sense of management.

If your bot is up and running, running pm2 list should show equally green and "online":

Congratulations! You accept just hosted your first bot on a Virtual Private Server, all on your own! Requite yourself a pat on the back — getting this far is a big deal!
You now know how to host one bot and even multiple bots on a single VPS!
For multiple bots, y'all would exercise the aforementioned verbal affair we did here and but start up some other process on PM2. Piece of cake peasy.
In the side by side department, we'll see our bot alive on our Discord server and sentry it really running in the wild… let's practice information technology.
Testing Our Bot on a Live Discord Server
The concluding step is testing our bot out "in the wild" on an actual Discord server!
Important: In example you lot oasis't generated a token yet and added your bot to Discord. Read through our guide on how to get a Discord bot token for step-past-pace instructions on adding your bot. Brand sure your token is inside "index.js" or you may meet errors.
I have already added "ping-pong-bot" to my Discord server, and since our process is actively running in PM2, we can see this bot as ONLINE!
Success!

All that's left for me to do is test out my lawmaking by typing "Ping". If all works every bit it should, my bot should say "Pong!" in the chat.
Let's give it a endeavour…
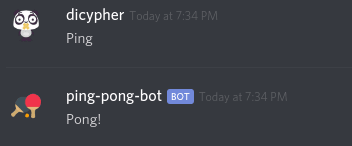
Information technology works. Our bot is officially upwardly, running, and online!
Shutting Off Your Discord Bot
Every bit a final step, y'all might desire to cease or restart your bot if you've made changes to your code, or merely want to start upwards another bot.
As I mentioned before, PM2 lets y'all run multiple bots (as many every bit your server permits). Since node.js is rather light, on Vultr's $five.00/mo program you should be able to run several bots with at to the lowest degree 100+ connections.
This is a rough estimate, of course, and depends on how much retentivity your lawmaking actually uses (and how large your bot is). The bespeak here is, you should be able to easily host multiple Discord bots without issue!
And if y'all ever wanted to upgrade, you could hands "clone" your Vultr VPS over to a larger more than powerful instance.
Anyways, lets first listing the processes we have running in PM2 with the "list" command:

And then we can end our app by typing "pm2 stop <app name>":

To verify, let'south go on Discord and check if our bot is offline:
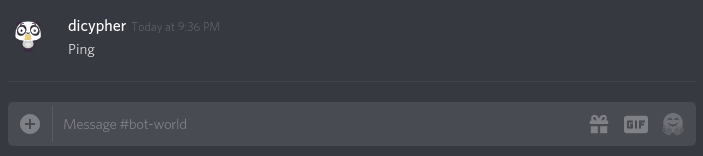
Crickets. Our bot is definitely offline.
Final Thoughts on VPS Discord Bot Hosting
And this concludes our Discord Bot Hosting guide.
You should now know everything yous demand to know to get your JavaScript / Node.js bot up and running on your own, personal Virtual Private Server.
If you want to host your bot in a similar language such as Python, all you need to do is install Python on your Vultr, and… you're good to go! (you but won't be able to use PM2)
The same goes for whatsoever programming language or code you want to run.
Fifty-fifty if you wanted to run a "Discord Bot Maker" case, y'all could practice and then past installing Windows on your VPS and starting it up from there (simply retrieve that Windows VPS servers are more expensive monthly than Linux, which is why nosotros tend to go with a popular Linux distro like Ubuntu).
Either mode, y'all've achieved what most won't — hosted your ain Discord bot on your ain VPS.
For that, I desire to say congratulations and good luck on your botting journey!
Alternative Discord Bot Hosting Options
Hosting your Discord bot on your own VPS is the best selection, simply non the simply selection.
If setting up a VPS just isn't for you, or if you simply similar exploring alternative hosting options, then this is the section for you.
We're going to cover hosting your own Discord bot on the Heroku platform, we'll talk virtually Amazon AWS, and so to conclude we'll become through an example of hosting your very own Discord bot on a Raspberry Pi.
Let's go moving!
Heroku
Heroku is a cloud awarding platform that lets you deploy your apps in the cloud and become them running nonstop, 24/vii.

Information technology works for hosting Node.js, Ruby, Java, PHP, Python, and Become lawmaking.
Heroku is free if you just want to experiment with your bot, simply paid if yous want your server to exist upward and running nonstop. The gratuitous version of Heroku lets you deploy an app (they call them "dynos"), just it'll go to sleep later every 30 minutes of inactivity.
As of the time this commodity was written, the cheapest paid plan for Heroku came in at $vii/mo.
This is considerably more hosting a bot on your ain VPS where you can:
(1) Get hosting for every bit low every bit $three.50/mo or $5.00/mo
(ii) Get a complimentary $100 to put towards hosting costs just for signing up!
Heroku is specially handy if you lot have most of your bot'southward code on GitHub since in that location's an "automated deploy" selection that pulls your code from GitHub and copies information technology over to your Heroku Dyno.
Important Note: If y'all put your code on GitHub and employ "automatic deploy", brand certain your repository is ready to private because information technology'll have to include your Discord bot token! Never make your repository public with your token visible.
In either case, Heroku can be a good hosting choice depending on what yous want to go out of it. Let's become through the process of setting it up.
Setup Guide: Hosting Your Discord Bot on Heroku
For our example setup, nosotros volition exist powering up a Discord bot written in JavaScript / Node.js on Heroku. This bot will also exist using the Discord.js library to interface with the Discord API.
Here is the Discord.js on Heroku guide we'll be post-obit along with.
The guide starts by going over some Heroku nuts and so introducing the files you demand in your project for hosting on Heroku (bundle.json, Procfile, .gitignore, and index.js).
You'll then install all of the prerequisites you need to go your bot upwards and running, including Node.js, Git, GitHub, and the Heroku CLI (command-line interface).
You'll then run the "npm init" command (only like we did in our VPS hosting portion of this guide, upward above) to create your parcel.json file, and then create a Procfile.
Heroku uses the "Procfile" or "Process File" to determine what processes are started on each of your "Dynos." For clarity, a "Dyno" is your virtual Heroku Container or "miniature server" in a sense.
Once you've done that you'll get your code transferred to your Heroku Dyno, and then deploy your app!
That'due south all there is to it. You accept successfully deployed your JavaScript / Node.js bot on Heroku!
Note: If you want more reliable hosting and complete ownership of your Discord bot's server, I recommend following the start part of this guide and setting up your own VPS .
AWS (Amazon Web Services)
AWS, or "Amazon Web Services", has been taking the world by tempest. In fact, there are hundreds of Fortune 500 companies using AWS to ability their internet infrastructures.
This makes AWS sound similar a pretty reliable bet, doesn't it?
For clarity, AWS is the "overarching" platform containing all of Amazon's services. For hosting our Discord bot specifically, we'll be using Amazon EC2 — Curt for ECC or "Elastic Compute Cloud".
This is where we'll be able to deploy our ain mini-server through EC2, and and then get it up and running with our Discord bot.
Note: Even though Amazon EC2 has dandy value in your offset year, we recommend setting up your own VPS Discord bot hosting for a slightly easier setup (meet the first part of this guide for details). EC2 offers 750 gratis hours for the first twelvemonth on their "EC2 Micro Instances" — afterwards that, y'all'll exist paying for uptime.
For our AWS / EC2 hosting example, nosotros're going to exist creating an EC2 Cloud Instance and deploying a JavaScript / Node.js bot.
Here is the Node.js bot deployment on EC2 guide we'll be following along with.
That guide is super in-depth and covers everything you lot'll need to know for deployment to EC2 — perfect for our purposes!
You'll commencement by creating a server case through EC2 (running on Ubuntu, to be exact), and so launching that case.
One time it'southward launched you'll set upwardly SSH (Secure Shell) access to your AWS server, and then upload your files through SFTP.
What you lot'll be doing here is very like to the process nosotros took in the first part of this guide to ready VPS bot hosting on Vultr. 1 of the large differences I noticed is using the "Forever" Node module for consistent 24/7 uptime rather than using "PM2" as we did in our guide.
Once yous've gotten your EC2 case configured with all of your bot files loaded, you'll launch your bot!
This method does crave some light Linux knowledge and commands, but it's non that difficult to follow along from commencement to end.
Raspberry Pi
A Raspberry Pi is a "miniature computer" — and that'south right, you can host your own Discord bot from your own R-Pi and have it up and running 24/7 (as long as y'all don't lose power!)
Every bit of the time this guide was written, the latest version of the R-Pi available on the market place was 4.0, but you can still observe older Raspberry Pi versions for sale on the web.
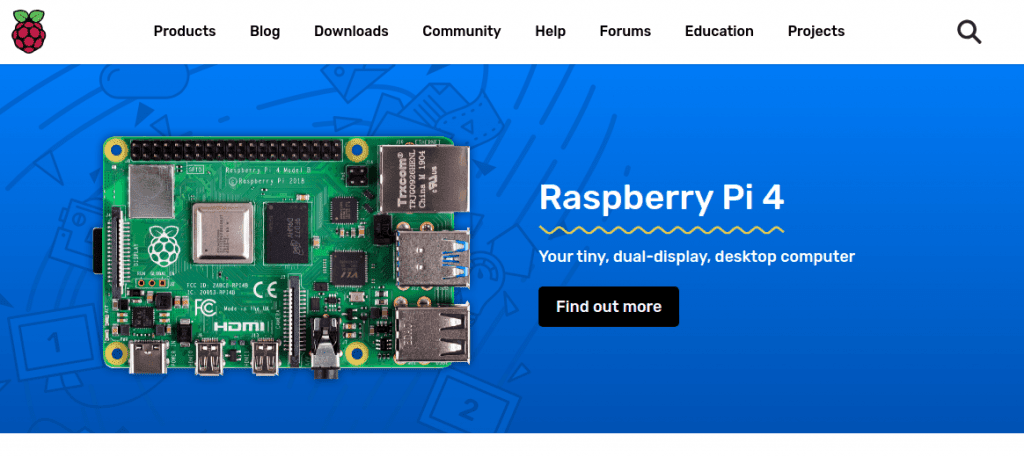
Hosting our Discord bot on a Raspberry Pi is going to be very similar to the process we took to host on a VPS since we'll still be using JavaScript / Node.js and working on a Linux platform.
Note: Your Raspberry Pi can be a very reliable Discord bot host, only information technology merely goes so far as you're able to keep it up and running. If you have a bot used by lots of different servers, your R-Pi may struggle to keep up with retentiveness/resources. This is why we still recommend hosting your own Discord bot on a VPS .
Hither are the guides y'all tin follow along for Raspberry Pi Hosting:
If you want to host a JavaScript / Node.js bot, install Linux on your Raspberry Pi and follow our VPS instructions exactly as they're written – easy as that!
If you want to host a Python bot with Discord.py, follow forth with this Python Raspberry Pi hosting guide . Difficulty: Intermediate
No thing which guide yous choose, both will get you to a working Raspberry Pi server for your Discord bot.
I mentioned earlier that the process of an R-Pi is going to be very like to how we hosted our bot on a VPS.
This is because it'll start out with you lot connecting to your Raspberry Pi, so installing either Node.js or Python.
One time you've installed your lawmaking runtime environment, you lot'll move on to loading your bot files into the Raspberry Pi.
And finally, once all of your bot'southward files are loaded, yous'll be able to commencement them up and go your bot running! The Node.js guide uses PM2 for procedure management (only like we did in our VPS hosting guide higher up), and the Python guide uses the Python runtime environment to launch your Discord bot.
Once you've launched your bot, make certain to periodically cheque in on your Raspberry Pi to ensure things are running smoothly.
And when your bot grows and starts being used by more servers (and more users simultaneously), you can e'er transfer over to VPS hosting to handle more bandwidth.
Gratuitous Discord Bot Hosting
Most of the Discord bot hosting options we've covered up until now take been paid or premium solutions.
These are, of course, the best options for reliable hosting — but what if you wanted to do it absolutely free?
Well, you're in luck because at that place are a few ways you lot tin can host your Discord bot for gratis without any Virtual Private Servers or Cloud Instances.
The showtime method we'll talk about is "Glitch," and the second method nosotros'll cover is uncomplicated "Self-Hosting" from your ain computer.
Remember: Both of these hosting methods won't be as reliable every bit an official, third-party VPS host , simply we can get some fairly decent reliability by implementing a few "unique tricks." Stay tuned for those.
WriteBots VPS Offer: Become a costless $100 to spend on hosting your own Discord Bot when you sign up today!
Self-Hosting
This is the ultimate gratis hosting option — running your Discord bot from your very own calculator.
Of course, this will only work well if you (one) Have your computer upwards and running 24/7 without going into sleep manner and (2) Take a fast cyberspace connection to handle API requests to your Discord bot.
Fortunately, hosting on your own figurer is extremely simple.
All you have to practice is install your code runtime environment (whether that'due south Node.js, Python, Java, etc.), and and so run your bot… that's it.
Once your bot is running information technology'll connect to and communicate with the Discord API, and run as it normally should.
If you're just getting started with Discord bots, this is a keen way to examination your bot and make sure it'south working correctly.
If y'all're looking for more permanent solutions, then you should consider getting your own private VPS server to host your bot and keep it up 24/seven, 365.
This is the simplest way to host a Discord bot and one that y'all should definitely take tried first when testing your bot or just starting out.
Hosting Specific Types of Discord Bots
So far, we've talked most hosting Discord bots at a very "general" level. Nosotros just causeless that your bot is a "blackness box" with some lawmaking, and your goal is to get it upwardly and running on a reliable server.
This is all well and good until we become to some more specific examples of bots that need to be hosted.
In this section, we're going to go over the process of hosting a Discord Music Bot, Discord.js Bot, and fifty-fifty bots fabricated with Discord Bot Maker.
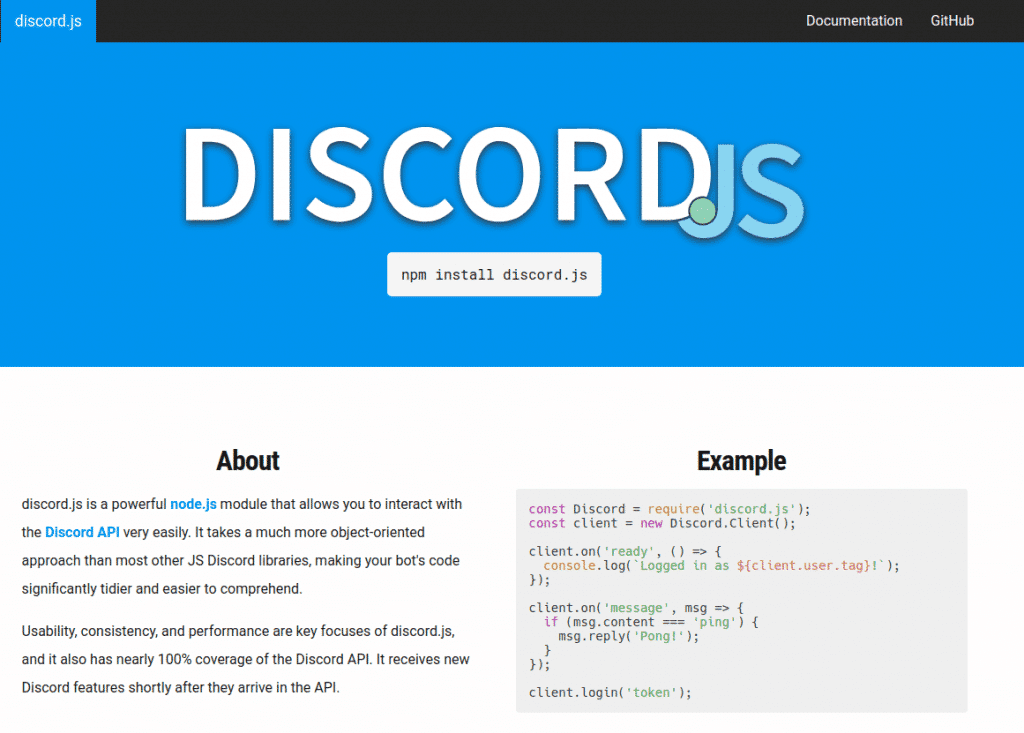
Discord.js Hosting
Hosting a bot made with Discord.js is one of the nearly mutual methods on the spider web today.
This involves having Node.js up and running and so installing the Discord.js module via. NPM (the Node Package Manager).
We cover Discord.js hosting in extreme particular in the first part of this guide .
If you lot follow along with the beginning of this hosting guide from showtime to terminate, you'll selection a reliable VPS host, get your code version controlled, gear up upwards your VPS server, and so load upward your Node.js / Discord.js lawmaking.
Past the cease, you lot'll have a fully configured VPS server running your Discord bot all day, every day.
And again, since nosotros already covered this in detail in the first part of this guide, we're going to point you lot over at that place to get your Discord.js bot hosted and ready!
Music Bot Hosting
Hosting a music bot is, equally you would imagine, more difficult than any regular Discord bot.
Since music bots actively buffer and stream data, they take up a lot more than bandwidth and a lot more memory than your typical Discord chatbot.
For this reason lone, we'd recommend going with a VPS hosting solution to bring upward your music bot to its maximum potential.
Follow along with our VPS Bot Hosting Guide for more details on how to go your bot up and running with tertiary-party hosting.
The process should be exactly the same, except for the additional audio modules/codecs your bot requires. Unfortunately, this isn't a "one size fits all" with every music bot using different modules and/or codecs.
One of the most pop codecs is FFmpeg, so your Discord Music Bot may be using information technology equally a dependency.
Either manner, your next steps are two-fold: (ane) Discover out which codecs/modules your music bot uses (2) Install those modules on your VPS in addition to the residuum of the modules you lot need to run your bot.
Once you take all of your modules/codecs installed, you'll exist able to beginning up your bot and then examination information technology out on your Discord server.
Happy listening!
Discord Bot Maker (DBM) Hosting
Ah, Discord Bot Maker.
I'one thousand personally not a fan of the software (it'southward too limited in my opinion, compared to what y'all tin create on your ain), but there are those of you lot out there who honey it and want to host your own bot with it.
I tin can respect that.
This part of the guide walks through everything you need to know about hosting a bot fabricated with Discord Bot Maker. It should be very simple to follow.
To host your Discord Bot Maker creation, you have one of two options:
Option 1: Self-Host your Discord bot on your own personal figurer
Option ii: Get a tertiary-party VPS with Windows on it and then install/run DBM.
DBM Hosting Deal for a Windows VPS: Since you're a WriteBots reader, there'southward an awesome deal where you lot can go $100 complimentary to put towards VPS hosting just for signing upwardly! Accept advantage of this earlier it disappears, and don't forget to cull the "Windows" server option.
If you're going with "self-hosting," all you demand to practice to host your DBM bot is just… to starting time up Discord Bot Maker and run your bot!
And if you make up one's mind to go with a Windows VPS Host, yous'll accept to connect remotely through RDP (Remote Desktop Connectedness) and and then install DBM that way.
Nice and like shooting fish in a barrel.
Once you've done that, you lot'll have your very own Discord bot created in DBM and hosted on your ain server. Great work!
The Impact of Reliable Hosting on Your Discord Server
Having reliable hosting for your Discord bot is crucial to your user experience.
Imagine if ane of your frequent Discord Server users joined a channel with your bot, tried to utilise your bot, and kept getting the disconnected or "offline" bulletin every single time.
I don't know well-nigh you, only I'd exist upset/annoyed if information technology happened consistently.
Having reliable bots on your server that are upwards and running no matter what time of twenty-four hour period it is — that'south how you grow your server to new levels.
Don't brand a bad impression on your new and seasoned Discord users.
Get reliable hosting for your bots.
Final Thoughts
Nosotros've covered a lot hither.
This guide should've taught you everything from hosting your JavaScript/Node.js bot through a Virtual Private Server (VPS), all the way to specific types of hosting for bots made on Discord Bot Maker or the Raspberry Pi.
No matter your goal with hosting your Discord bot, I sincerely hope this guide gave you all of the answers y'all needed.
Exit a comment below and let me know if there's annihilation you're stuck with, take a suggestion on, or think is missing from this guide.
I wish you the all-time of luck with your Discord bot hosting endeavors!
lynchforneirdis1985.blogspot.com
Source: https://www.writebots.com/discord-bot-hosting/
0 Response to "How to Upload Discord Bot to Repository"
Post a Comment